Ever wished you could command your smart home from a mountaintop, monitor your industrial machinery from a beach, or tweak your server settings from a bustling city cafe? The dream of truly ubiquitous IoT control is within reach, and it's surprisingly free, thanks to the power of SSH on your Windows 10 machine.
This seemingly complex task of setting up a secure and free IoT SSH connection on Windows 10 is demystified in this comprehensive guide. Whether you're a seasoned IT professional managing sprawling industrial IoT deployments or a hobbyist eager to control your smart bulbs from afar, the ability to securely access your IoT devices remotely is paramount. With this guide, you'll learn how to harness the power of SSH, transforming your Windows 10 machine into a secure command center for your connected world, without breaking the bank on expensive software or proprietary solutions. This article explores the ins and outs of setting up an IoT SSH connection, ensuring your devices remain both accessible and secure. Get ready to unlock a world of possibilities, from managing security cameras to automating industrial processes, all from the comfort of your Windows 10 device.
| Category | Information |
|---|---|
| Concept | Secure remote access to IoT devices using SSH on Windows 10 |
| Benefits | Cost-effective, enhanced security, remote management capabilities |
| Target Audience | Hobbyists, IT professionals, smart home enthusiasts |
| Key Components | Windows 10 machine, SSH client, configured router |
| Related Terms | IoT, SSH, Windows 10, Port Forwarding, Remote Access |
| Resource | Raspberry Pi Official Website |
The benefits of leveraging SSH for IoT management are manifold. Not only does it eliminate the need for expensive, often proprietary, software and hardware solutions, but it also provides a secure and reliable channel for communication with your devices. This is especially crucial in an era where cybersecurity threats are ever-present. SSH encrypts the data transmitted between your Windows 10 machine and your IoT device, safeguarding sensitive information from prying eyes. These advantages collectively make SSH an exceptionally attractive option for anyone seeking to manage their IoT devices remotely, securely, and affordably.
- Who Are David Bromstads Siblings Meet Dean Dynelle Dyonne
- Stephen A Smith Scandals Controversies More Exposed
Configuring SSH on Windows 10 might seem daunting at first, but it is, in fact, a relatively straightforward process, particularly with a step-by-step guide like this one. The key is to approach it methodically, ensuring that each step is completed accurately. Before diving into the configuration process, it's essential to understand the fundamental prerequisites that must be met to establish a successful SSH connection.
The primary requirement is, of course, a Windows 10 machine. Ensure that your operating system is up-to-date with the latest security patches and updates. This will minimize potential vulnerabilities and ensure compatibility with the SSH client software. Secondly, you'll need an IoT device that supports SSH. Most Linux-based devices, such as Raspberry Pis, come with SSH pre-installed or offer easy installation options. However, some IoT devices may require you to enable SSH manually through their configuration settings.
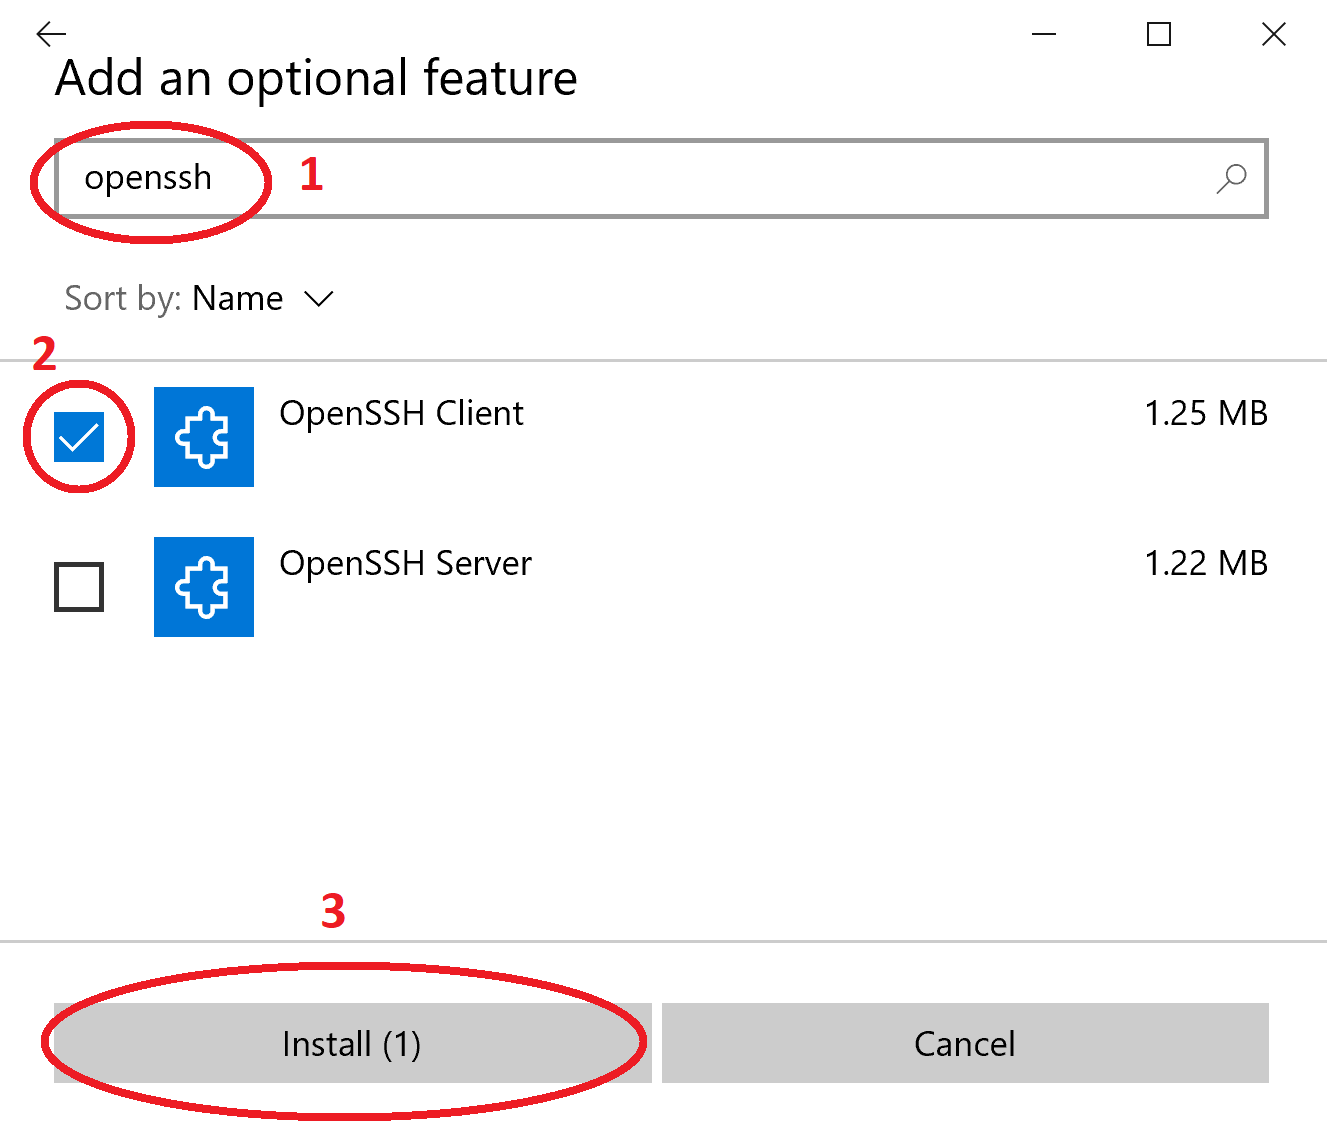
The heart of the SSH connection lies in the SSH client. On Windows 10, several excellent SSH clients are available, both free and commercial. One of the most popular and widely used free options is PuTTY. PuTTY is a lightweight, open-source SSH client that provides a user-friendly interface for establishing secure connections. Its simplicity and versatility make it an ideal choice for both beginners and experienced users. Other alternatives include KiTTY, a fork of PuTTY with additional features, and the built-in SSH client in newer versions of Windows 10, accessible through the command line or PowerShell.
- Wentworth Miller Marriage Dating Relationships The Truth
- Chlo Matt Tiktok Viral Pranks House Tours More
Once you've selected and installed your SSH client, the next crucial step is to configure port forwarding on your router. Port forwarding is the process of directing incoming network traffic from a specific port on your router's public IP address to a specific device on your local network. In the context of SSH, you'll typically forward port 22 (the default SSH port) or a custom port of your choosing to the IP address of your IoT device. This allows external connections to reach your device through your router.
Configuring port forwarding varies slightly depending on your router's make and model. Consult your router's documentation or online resources for specific instructions. Generally, you'll need to access your router's configuration interface through a web browser, typically by entering your router's IP address (e.g., 192.168.1.1 or 192.168.0.1) into the address bar. Locate the port forwarding or virtual server settings, and create a new rule that forwards the desired port to your IoT device's IP address.
Finally, ensure that your IoT device is accessible on your local network. Verify that it is powered on, connected to the network, and that its IP address is correctly configured. You can typically find the IP address of your IoT device through your router's configuration interface or by using network scanning tools. Once you've confirmed that all prerequisites are met, you're ready to configure SSH on your Windows 10 machine and connect to your IoT device.
Let's assume you've opted for PuTTY as your SSH client. The configuration process is straightforward. Open PuTTY, and you'll be presented with the main configuration window. In the "Host Name (or IP address)" field, enter the public IP address of your router. This is the address that external devices will use to connect to your network. If you're connecting from within your local network, you can enter the local IP address of your IoT device instead.
In the "Port" field, enter the port number that you forwarded on your router. If you used the default SSH port (22), enter 22. Otherwise, enter the custom port number you selected. Under the "Connection type" section, ensure that "SSH" is selected. Before connecting, you may want to save your configuration for future use. In the "Saved Sessions" field, enter a descriptive name for your session, such as "My IoT Device," and click the "Save" button.
Now, click the "Open" button to initiate the SSH connection. If this is your first time connecting to the IoT device, PuTTY may display a security alert, warning you that the server's host key is not cached in your registry. This is normal. Click "Yes" to accept the host key and proceed with the connection. You'll then be prompted to enter your username and password for the IoT device. Once you've entered your credentials, you'll be logged in to the device's command-line interface.
Congratulations! You've successfully established an SSH connection to your IoT device from your Windows 10 machine. You can now execute commands, manage files, and perform other administrative tasks as if you were physically connected to the device. With SSH, you can confidently manage your IoT devices from anywhere in the world, knowing that your connection is secure and reliable. Whether you're controlling smart home gadgets, monitoring industrial equipment, or managing remote servers, having secure access is absolutely essential.
Imagine the possibilities: managing your smart home from across the globe, monitoring security cameras in real-time, tweaking server settings while on vacation, all for free, using your Windows 10 machine. This is the power of SSH, and it's now within your grasp. This guide has walked you through the essential steps of setting up IoT SSH, ensuring your devices stay secure, accessible, and manageable without incurring hefty costs. Embrace the convenience and security of SSH, and unlock the full potential of your connected world.
Whether you're a hobbyist tinkering with smart home gadgets or an IT professional managing industrial IoT systems, mastering SSH on Windows 10 can save you time, enhance security, and empower you to manage your devices from anywhere in the world. SSH provides a secure and cost-effective alternative to expensive software or dedicated hardware solutions. By following the steps outlined in this guide, you can confidently establish SSH connections to your IoT devices and enjoy the benefits of remote management and control.
To make this concept a reality, a few key components are required. First and foremost, an SSH client is needed on your Windows 10 machine. This client acts as your gateway, facilitating the secure connection to your IoT devices. Popular choices include PuTTY, KiTTY, and the built-in SSH client in newer versions of Windows 10. Secondly, configuring port forwarding on your router is essential. This process creates a pathway, enabling external connections to reach your IoT devices behind your router's firewall. Finally, ensuring your IoT device is properly configured and accessible on your network is crucial for a successful SSH connection.
In conclusion, SSH on Windows 10 offers a powerful, secure, and cost-effective solution for managing your IoT devices remotely. By following the steps outlined in this guide, you can unlock the full potential of your connected world, transforming how you interact with your devices and enabling you to manage them from anywhere in the world. So, embrace the power of SSH, and experience the freedom and control it offers.
- Stephanie Gosk Inside Her Life Net Worth Career
- Gregor Clegane Unveiling The Mountains Brutal Legacy Details