Is your ceiling looking tired and worn?
Replacing those old ceiling tiles might be easier and more affordable than you think, instantly revitalizing your space. The expense associated with replacing ceiling tiles is a multifaceted question, the answer to which largely depends on the choices you make in terms of product selection. Prices can vary substantially, a fact that underscores the importance of careful consideration and research before committing to a purchase.
| Attribute | Details |
|---|
| Material | Various materials, including mineral fiber, fiberglass, metal, and wood. |
| Size | Common sizes include 2x2 feet and 2x4 feet, but custom sizes are available. |
| Cost per Tile | Ranges from around 0.60 to 10 or more, depending on material and design. |
| Installation | Typically installed in a suspended grid system. |
| Lifespan | Can last for many years with proper maintenance. |
| Maintenance | Easy to clean and replace individual tiles as needed. |
| Acoustic Properties | Many tiles offer sound absorption to reduce noise. |
| Fire Resistance | Some tiles are fire-resistant, providing added safety. |
| Design Options | Available in a wide range of colors, patterns, and textures. |
| Environmental Impact | Some tiles are made from recycled materials. |
| Reference Website | Armstrong Ceilings |
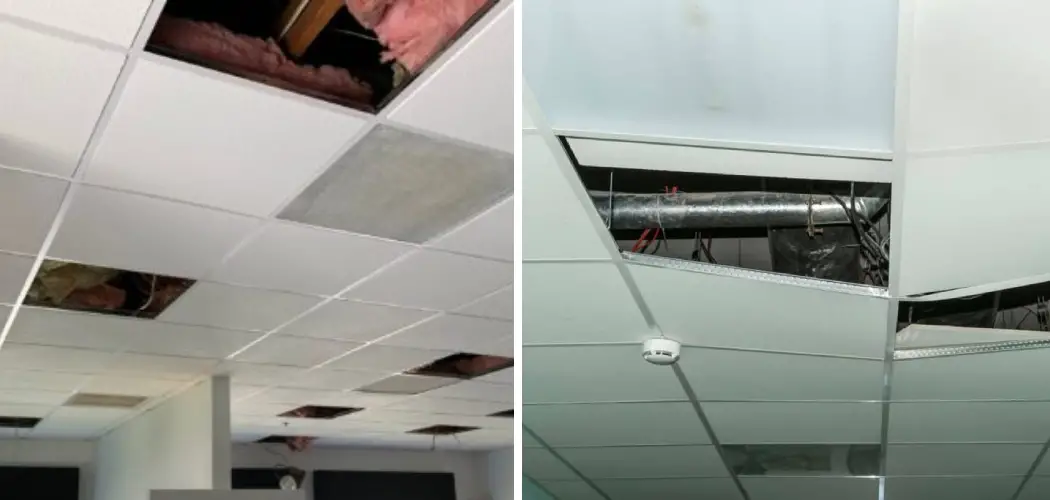
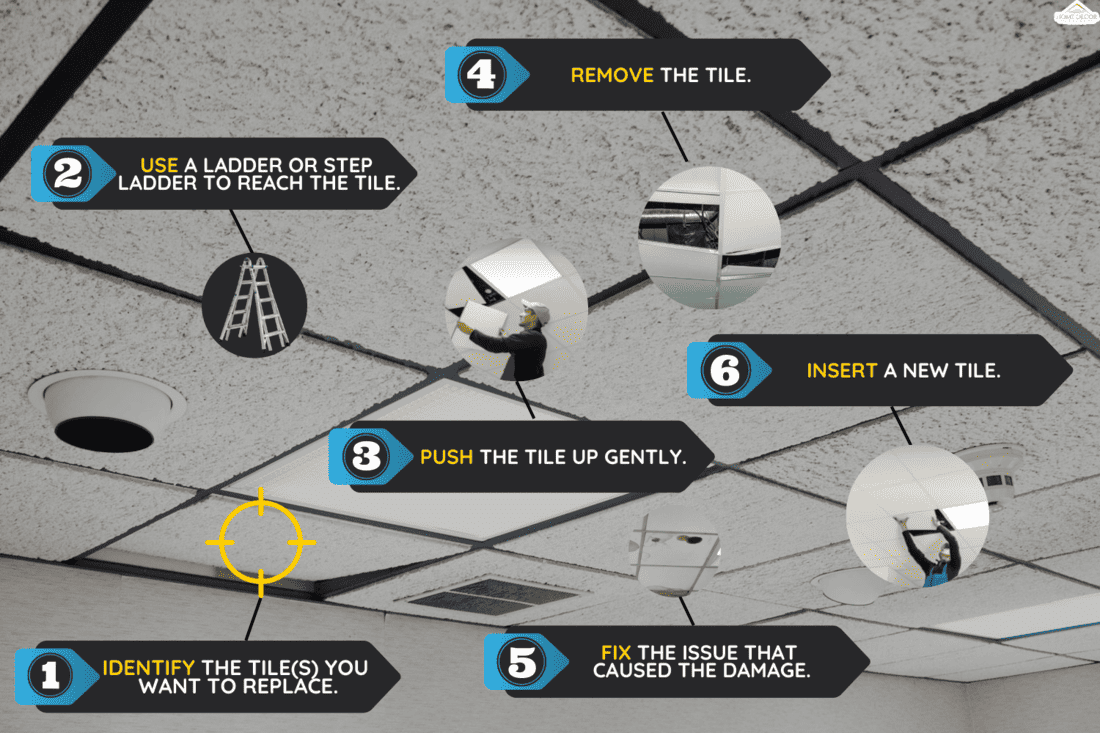
A comprehensive overview of the prices is generally accessible on the individual product pages of most reputable suppliers, with costs typically spanning from approximately 38.00 to upwards of 485. This broad spectrum reflects the diverse range of materials, designs, and functionalities available in the ceiling tile market. For the budget-conscious homeowner or business owner, investing in a suspended ceiling can represent a strategic, long-term financial decision. While the initial outlay might seem significant, the savings accrued over time can be substantial. Suspended ceilings not only offer aesthetic versatility but also provide practical benefits such as improved insulation, sound dampening, and easy access to utilities housed above the ceiling. One of the initial hurdles in any ceiling replacement project is determining the precise number of ceiling panels required. Accurate measurements are crucial to avoid material wastage and ensure a seamless, professional finish. Similarly, understanding how to properly address border areas is essential for achieving a visually appealing and structurally sound ceiling. If you find yourself at the nascent stages of planning your drop ceiling installation, or if you're simply seeking to expand your knowledge of the process, a wealth of resources is available to guide you. From detailed installation guides to handy calculators, these tools can empower you to make informed decisions and execute your project with confidence. For those contemplating a hands-on approach, a "drop ceiling installation (full installation guide) drop ceiling calculator" can be an invaluable asset. Such resources typically provide step-by-step instructions, material lists, and troubleshooting tips, enabling even novice DIYers to tackle the project with competence. While some home improvement endeavors are best left to seasoned professionals, replacing interlocking ceiling tiles is often a manageable task for those with a modicum of DIY experience. With careful planning and attention to detail, you can achieve a professional-looking result without breaking the bank. A comprehensive guide can prove indispensable in navigating the intricacies of replacing interlocking ceiling tiles. By providing clear, concise instructions and visual aids, such a guide can streamline the process and minimize the risk of errors, ensuring a smooth and efficient home improvement experience. Interlocking ceiling tiles have enjoyed enduring popularity in home design for decades, owing to their ease of installation and timeless aesthetic appeal. Their modular design allows for quick and simple replacement of damaged tiles, making them a practical choice for homeowners seeking a low-maintenance ceiling solution. Removing drop ceiling tiles is a relatively straightforward procedure that requires minimal tools or expertise. With a few simple steps, you can safely and efficiently remove old or damaged tiles, preparing the way for new installations or repairs. The process of removing drop ceiling tiles is generally uncomplicated and can be accomplished in a few easy steps. However, it is crucial to prioritize safety throughout the procedure, as the space above the ceiling may contain hidden hazards. When removing drop ceiling tiles, it is imperative to exercise caution and take appropriate safety measures. Electrical wiring, plumbing fixtures, and mechanical components may be concealed above the ceiling, posing potential risks of injury or damage. As previously mentioned, the area above the ceiling may harbor a variety of electrical, mechanical, and plumbing installations. Contact with these systems can result in serious injury or property damage, underscoring the need for vigilance and adherence to safety protocols. To mitigate the risks associated with removing drop ceiling tiles, it is essential to take extra precautions to protect yourself and others from potential harm. This may involve wearing appropriate safety gear, disconnecting power sources, and seeking professional assistance when necessary. Whether your goal is to refresh your entire ceiling or simply replace a few damaged tiles, understanding the proper techniques and procedures is crucial for achieving a satisfactory outcome. Knowing when, why, and how to replace ceiling tiles correctly can save you time, money, and frustration. A drop ceiling, also known as a suspended ceiling, comprises a metal grid suspended below the structural ceiling of a room. This grid serves as a framework for holding ceiling tiles or panels, creating a finished ceiling surface that conceals wiring, ductwork, and other utilities. Ceiling tiles or panels are then strategically placed within the grid to create the final, aesthetically pleasing ceiling surface. These tiles are available in a wide array of materials, designs, and textures, allowing for customization to suit various interior design styles. For a more in-depth understanding of the various components that constitute a drop ceiling, further exploration is highly recommended. Familiarizing yourself with the terminology and functionality of each component will empower you to make informed decisions and ensure a successful installation. A comprehensive suspended (drop) ceiling installation guide can serve as an invaluable resource for those embarking on this type of project. Such guides typically provide detailed instructions, material lists, and safety precautions, enabling you to navigate the installation process with confidence. Acquiring knowledge about how to install a drop ceiling, including the necessary materials and tools, is essential for a successful outcome. Armed with this information, you can effectively plan and execute your project, minimizing errors and maximizing efficiency. From the initial layout and planning stages to the final execution, a well-structured guide will walk you through the key steps involved in installing a ceiling. By following these guidelines, you can ensure a structurally sound and visually appealing result that enhances the overall aesthetic of your space. For those seeking to maximize headroom while maintaining easy access to pipes and ducts above, innovative solutions such as quickhang hooks and brackets offer a viable alternative to traditional hanger wire. These systems allow for direct attachment of the drop ceiling to joists, resulting in a faster and simpler installation process. Ceiling tiles, the fundamental building blocks of a drop ceiling, are available in a diverse range of materials, sizes, and designs. From classic mineral fiber tiles to contemporary metal panels, the options are virtually limitless. Hanger wires, crucial components of a suspended ceiling, serve to attach the main beams and cross tees to the ceiling joists above. These wires provide essential support and stability, ensuring that the ceiling remains securely in place. The plenum, the space between the drop ceiling and the structure above, typically houses various mechanical and electrical systems, such as ductwork, wiring, and plumbing. This concealed area allows for easy access to these systems for maintenance and repairs. A drooping ceiling tile is more than just an eyesore; it can also indicate a potentially serious structural issue that requires prompt attention. Ignoring the problem can lead to further damage and more costly repairs in the long run. Failure to address a sagging ceiling tile promptly can result in a cascade of problems, including further deterioration of the tile, damage to surrounding structures, and even safety hazards. Early intervention is key to preventing more extensive and expensive repairs. Sagging ceiling tiles not only detract from the visual appeal of a room but also pose a potential safety risk if they become dislodged and fall. Promptly addressing this issue is crucial for maintaining a safe and aesthetically pleasing environment. To accurately assess the extent of the problem and determine the best course of action, it is recommended to use a tape measure to locate the center of the sagging ceiling tile. This will provide a reference point for evaluating the severity of the sag and identifying any underlying structural issues. Replacing drop ceilings can be a swift and straightforward process, particularly when dealing with standard-sized tiles and a well-maintained grid system. With the right tools and techniques, you can refresh your ceiling in a matter of hours. In most cases, removing a drop ceiling tile is as simple as lifting up on it, causing it to pop out of the grid. This ease of removal allows for quick replacement of damaged or outdated tiles, making it a convenient and cost-effective ceiling solution. Once you have obtained a replacement tile, it can be easily installed by dropping it into the same area on the grid from which the old tile was removed. This simple installation process minimizes disruption and allows for quick and efficient ceiling repairs. For those undertaking a complete drop ceiling overhaul, a series of nine easy steps can streamline the process and ensure a successful outcome. These steps typically include removing the old tiles and grid, preparing the ceiling surface, and installing the new grid and tiles. The initial step in any drop ceiling replacement project is to carefully remove the old ceiling tiles and grid. This requires attention to detail and adherence to safety precautions to avoid damage to the surrounding structures. The first step involves removing any light fixtures or other obstructions attached to the existing ceiling. This may require disconnecting electrical wiring, so it is crucial to exercise caution and follow all safety guidelines. If you have an unfinished basement and are seeking an alternative to drywall for the ceiling, a drop ceiling can be an excellent option. It provides a finished look while allowing easy access to wiring, plumbing, and other utilities. Whether you're simply refreshing your existing ceiling tiles or replacing damaged ones, understanding the correct procedures is crucial for achieving a satisfactory result. Proper preparation, careful execution, and attention to detail are key to a successful outcome. A drop ceiling, also known as a suspended ceiling, consists of a suspended metal grid that hangs below the structural ceiling. This grid provides a framework for supporting ceiling tiles or panels, creating a finished ceiling surface. Ceiling tiles or panels are then placed within the grid to create the finished look. These tiles are available in a wide variety of materials, colors, and textures, allowing for customization to suit different aesthetic preferences. To gain a deeper understanding of the various components of a drop ceiling, further research is recommended. Familiarizing yourself with the terminology and function of each component will empower you to make informed decisions about your ceiling project. Installing suspended/drop tiles typically involves several key steps, including preparing the ceiling surface, installing the grid system, and placing the tiles into the grid. Following a step-by-step guide can ensure a smooth and successful installation. When replacing ceiling tiles, it is important to consider whether you need new tiles, replacement tiles, or simply a way to reface your existing tiles. Each option has its own advantages and disadvantages, depending on the condition of your existing ceiling and your budget. Refacing existing ceiling tiles can be a cost-effective way to update the look of your ceiling without the expense of replacing the entire system. This involves applying a new surface or covering to the existing tiles, giving them a fresh, new appearance. Installing joint strips is a crucial step in many ceiling tile installations, as these strips help to conceal seams and create a seamless, professional look. Joint strips are typically required for certain types of ceiling tiles and should be installed according to the manufacturer's instructions. To learn more about how to install a drop ceiling, including the necessary materials and tools, consult a comprehensive installation guide. This will provide you with the knowledge and skills needed to successfully complete your project. From the initial layout and planning to the final execution, a well-structured guide will walk you through the essential steps of installing a ceiling. This comprehensive approach ensures a structurally sound and aesthetically pleasing result. While modifying drop ceiling grids to accommodate tiles of different sizes is technically possible, it is often a labor-intensive and time-consuming process. In most cases, it is more efficient to simply purchase tiles that are compatible with your existing grid system. Removing old drop ceiling tiles is a relatively easy task that can be accomplished with a few simple tools and techniques. By following a step-by-step guide, you can safely and efficiently remove the old tiles and prepare the ceiling for new installations. The cost of replacing drop ceiling tiles is influenced by several factors, including the number of tiles you need to replace, whether you are replacing the entire ceiling, and whether you choose to do the work yourself. Careful consideration of these factors is essential for budgeting your project effectively. The style of tile you require will also have a significant impact on the overall price. Specialty tiles, such as those with intricate designs or acoustic properties, typically command a higher price than standard, basic tiles. If you opt to replace the tiles yourself, you can expect to pay around 60 per tile, depending on the material and design. This cost can vary significantly, so it is important to shop around and compare prices before making a purchase. Tin tiles can be easily installed directly into a drop ceiling grid, providing a straightforward and stylish upgrade to your existing ceiling. This is a popular option for those seeking a more decorative and visually appealing ceiling solution. If you are considering moving away from a drop ceiling entirely and opting for a more traditional ceiling style, such as drywall or plaster, there are several factors to consider. This transition typically involves more extensive and costly renovations, so it is important to weigh the pros and cons carefully. Removing a tile from a suspended ceiling is a simple process that requires no special tools or expertise. With a gentle push and a slight turn, the tile can be easily removed from the grid. To ensure a proper fit for the new tile, it is advisable to save the old tile as a template for measuring and cutting the replacement. This will help you avoid mistakes and ensure a seamless integration with the existing ceiling. For interlocking tile ceilings, it is necessary to make cuts in the damaged tile using an X-shaped pattern. This allows for easy removal of the damaged section without disturbing the surrounding tiles. Replacing drop ceiling tiles typically involves nine easy steps, including removing the old tiles and grid, preparing the ceiling surface, and installing the new grid and tiles. Following these steps will ensure a smooth and successful outcome. The first step is to carefully remove the old ceiling tiles and grid, taking precautions to avoid damage to the surrounding structures. This may involve disconnecting electrical wiring, so it is important to exercise caution and follow all safety guidelines. The initial step in any ceiling replacement project is to remove any light fixtures or other obstructions that are attached to the existing ceiling. This requires careful planning and execution to avoid accidents or damage. Instructions for how to replace drop ceiling tiles, including how to cut a ceiling tile to fit a rectangular opening, are readily available online and in home improvement guides. These resources can provide valuable assistance for DIY projects. This article covers various aspects of ceiling tiles, including an introduction, a discussion of the necessary tools, instructions for removing a ceiling tile, and guidance on cutting ceiling tiles. The materials used in the project include UDecor/ProCeiling DuraClean ceiling tiles.