Are you tired of wrestling with the complexities of Kubernetes? Imagine a world where Kubernetes management is intuitive, efficient, and even enjoyable. That world exists with Lens, the Kubernetes IDE designed to simplify your workflow and boost your productivity.
Lens isn't just another tool; it's a comprehensive platform that transforms the daunting task of managing Kubernetes clusters into a streamlined, visually driven experience. From developers to operations teams, Lens empowers users to interact with their clusters seamlessly, regardless of their underlying infrastructure. Whether you're deploying applications, monitoring performance, or troubleshooting issues, Lens provides the clarity and control you need to succeed.
| Attribute | Description |
|---|---|
| Name | Lens (Kubernetes IDE) |
| Type | Integrated Development Environment (IDE) for Kubernetes |
| Function | Management and monitoring of Kubernetes clusters |
| Key Features | Visual interface, cluster connection management, resource monitoring, deployment management, troubleshooting tools, security features |
| Operating Systems | macOS, Windows, Linux |
| Licensing | Open Source (MIT License) |
| Original Developer | Kontena (acquired by Mirantis) |
| Current Maintainer | Mirantis |
| User Base | 650,000+ users, tens of thousands of organizations |
| Use Cases | Development, operations, monitoring, troubleshooting |
| Integration | Connects to clusters using kubeconfig files, integrates with Prometheus for metrics |
| Installation Methods | Standalone application, package managers (e.g., apt, yum), silent installation options |
| Official Website | https://k8slens.dev/ |
The core of Lens lies in its ability to deliver software faster. This is achieved by providing developers with a clear and concise view of their Kubernetes environment, enabling them to quickly identify and resolve issues that might otherwise slow down the development process. By transforming Kubernetes complexity into clarity, Lens allows teams to focus on what truly matters: building and deploying great software.
- Jeff Ross Cancer News Updates Diagnosis Treatment
- The Clark Sisters Gospel Icons Legacy Latest News Updates
One of the key differentiators of Lens is its focus on security. Ensuring that Kubernetes deployments are secure from the developer's desktop, through staging, and all the way to production is paramount. Lens incorporates security best practices and provides tools to help users identify and mitigate potential vulnerabilities throughout the deployment pipeline. This proactive approach to security helps organizations protect their sensitive data and maintain the integrity of their applications.
Understanding the distinction between Lens IDE and Lens Desktop is crucial for choosing the right tool for your Kubernetes workflow. Lens Desktop is the standalone application that provides the full suite of features for managing and monitoring your clusters. It's a powerful development tool geared towards building and managing containerized applications within Kubernetes. Lens IDE, on the other hand, refers to the broader concept of an integrated development environment tailored for Kubernetes, and Lens Desktop embodies this concept.
Getting started with Lens is straightforward. Simply install Lens Desktop, sign up for a Lens ID, and start working with your Kubernetes clusters. Out of the box, Lens can connect to Kubernetes clusters using your kubeconfig file and will display information about the cluster and the objects it contains. This immediate visibility into your cluster's resources is invaluable for understanding its current state and identifying potential problems.
- Shannon Sharpes Love Life Wives Dating Relationships Revealed
- Easy Hey There Delilah Guitar Tutorial Chords Tabs
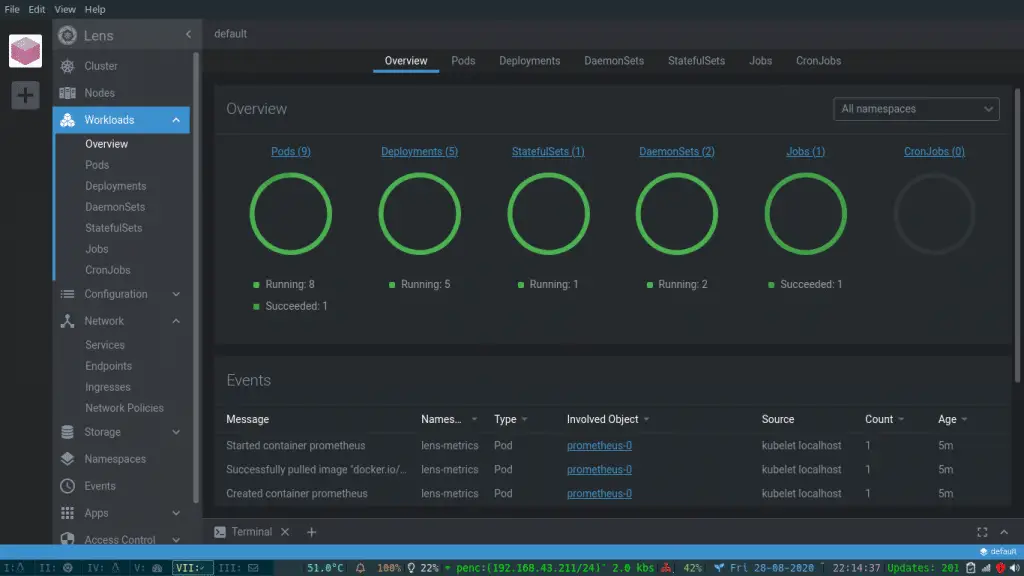
Lens can also connect toor installa Prometheus stack, allowing you to monitor your cluster's performance in real time. When you first install OpenLens or Lens, you will need to install the Prometheus stack included with the solution to start pulling metrics information from your Kubernetes clusters. Underneath the settings for your Kubernetes cluster once you are attached, you will see the Lens metrics entry. Here you can simply toggle the Prometheus integration on or off to start collecting and visualizing metrics.
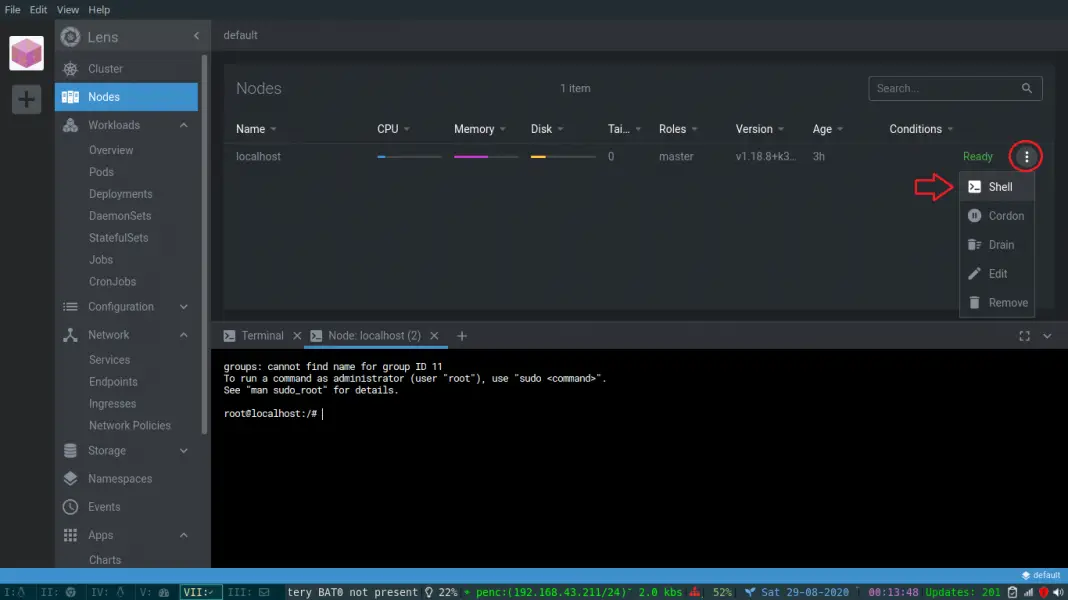
Lens gives you all the information you need about a cluster it manages. To help you get started, the Lens menu sections offer a wealth of information and options. From navigating the cluster's resources to configuring deployments, the Lens interface is designed to be intuitive and user-friendly. Even if you're new to Kubernetes, Lens makes it easy to get up to speed and start managing your clusters effectively.
For those who need a refresher on Kubernetes terminology, a beginner's guide to Kubernetes container orchestration can provide a solid foundation. Understanding the fundamental concepts of Kubernetes, such as pods, deployments, and services, will help you get the most out of Lens and better manage your clusters.
Lens is a Kubernetes platform that provides tools for seamless interaction with Kubernetes clusters, and an environment for secure and effective work within teams and organizations. Its visual interface and intuitive design make it easy for users to navigate and manage their clusters, while its robust feature set provides the tools needed to deploy, monitor, and troubleshoot applications.
More than 650,000 usersand tens of thousands of organizationsrely on Lens to interact with Kubernetes clusters, whether for development, operations, or both. This widespread adoption is a testament to the value and effectiveness of Lens as a Kubernetes management platform.
If you need to install applications within your Kubernetes cluster, you can follow the Helm installation guide to install Helm on your machine. Helm is a package manager for Kubernetes that simplifies the deployment and management of applications. Although you still edit the chart YAMLs in VS Code or other editors, Lens gives you a visualized view of your cluster, making it easier to understand the relationships between different components.
You can get Lens from the Lens official site. The installation process is straightforward and well-documented, ensuring that you can quickly get up and running with the platform. If you have a Windows system with WSL installed and have set up access to a public cloud for connecting to your clusters via kubectl, this means you probably have installed the necessary cloud CLI tools (such as AWS or gcloud) via WSL (on Ubuntu say). So from Ubuntu you can run kubectl commands to access your clusters. You will also want to access your clusters using Lens, and you might be wondering how to configure Lens to work with your WSL environment.
Lens is the only IDE youll ever need to take control of your Kubernetes clusters. It's open source and free, making it accessible to developers and organizations of all sizes. By default, this package will install for all users; however, the following parameter is available to install into the current user profile:
To install Lens Desktop on Windows, download the Lens Desktop installer for Windows from k8slens.dev/download. The default Lens Desktop installation path is c:\users\appdata\local\programs\lens. Silent installation is also supported, allowing you to automate the installation process for large-scale deployments.
Lens is the largest and most advanced Kubernetes platform in the world. It's built on open source and free principles, ensuring that it remains accessible and adaptable to the evolving needs of the Kubernetes community.
Beyond simply connecting to existing clusters, Lens also simplifies the process of setting up new ones. Whether you need to install a production Kubernetes cluster with Rancher RKE, install a Kubernetes cluster on Ubuntu with Kubeadm, or easily set up a Kubernetes cluster on AWS with EKS, Lens provides the tools and guidance you need to get started quickly. The installation of the Lens Kubernetes dashboard & IDE is designed to be as seamless as possible.
Lens helps you manage and monitor your clusters in real time. Its visual interface provides a clear and concise view of your cluster's resources, allowing you to quickly identify and resolve issues. Lens is a standalone application that can be installed on macOS, Windows, and most Linux distros. This guide covers how you can install and set up Lens with Zeet to inspect and debug your Kubernetes resources.
Improve your monitoring and troubleshooting capabilities with Lens. Its real-time monitoring and alerting features help you proactively identify and resolve issues before they impact your applications. Lens is an integrated development environment (IDE) that allows users to connect and manage multiple Kubernetes clusters on Mac, Windows, and Linux platforms. It was originally developed by Kontena, a Finnish startup, and later acquired by Mirantis and open sourced under the MIT license.
You can use Lens to interact with your clusters visually instead of being dependent on obscure CLI commands. This visual approach makes it easier to understand the relationships between different components and to troubleshoot issues. To get started with the Lens IDE, you'll need to install it on your system.
Installing Lens on Ubuntu 22.04 is a straightforward process. Open a terminal on your Ubuntu 22.04 system and add the Lens repository to your system's package sources:
Lens is more than just a Kubernetes IDE; it's a comprehensive platform for managing and monitoring your clusters. Its intuitive interface, robust feature set, and open-source nature make it an invaluable tool for developers and operations teams alike. With Lens, you can transform Kubernetes complexity into clarity and empower your teams to focus on what matters most.
- Untold Story Judith Barsi Burt Reynolds All Dogs Go To Heaven
- Joanne Whalley Willow Star Val Kilmer Life After Fame